Wednesday, November 30, 2011

A recipe from Pinterest...

I saw this recipe on Pinterest.
 It looked SO good. 
(really good, right?)

 
Here is the recipe: 

 I tweeked it a bit!!
Here is my version!


•6 tablespoons butter, plus more for baking dishes
• kosher salt and black pepper
•1 pound penne rigate
•1 teaspoon olive oil
•2 boneless, skinless chicken breast halves (about 8 ounces each), halved horizontally
• 1/2 cup plus 2 tablespoons flour
•6 garlic cloves, finely minced
•6 cups milk
•10 ounces of mushrooms.
• 1 cup sliced oil-packed sun-dried tomatoes, drained
(The recipe called for sun-dried tomatoes...but they are expensive.  So I used a red pepper instead.)
•1 1/2 cups shredded provolone (6 ounces) (I used an italian blend that had provolone in it)
•1 1/2 cup freshly grated Parmesan (about 6 ounces)


  1. Preheat oven to 400. Butter two shallow 2-quart baking dishes. If you’re going to freeze one, use a disposable foil pan. In a large pot of boiling salted water, cook pasta 3 minutes short of al dente; drain pasta and set aside.
  by K'Brina

While pasta is boiling season chicken with salt and pepper.  I brown my chicken on both sides in a cast iron pan, then put it into the oven to finish baking.  I also add the red pepper in the oven.  Coat it with olive oil and turn over.  When its done let it cool and peel off the skin. 
  by K'Brina
Saute the mushroomsuntil golden brown (3-4 minutes). 
Use a little extra olive oil if needed.

  by K'Brina

In a 5-quart Dutch oven or heavy pot , melt butter over medium. Add flour and garlic; cook, whisking, 1 minute. While whisking constantly, gradually add milk; bring to a simmer. Keep whisking frequently as sauce thickens, about 1 minute more. Add mushrooms and sliced peppers; cook 1 minute.
Take the pan off the heat and and gradually stir in provolone and 1/2 cup Parmesan.

  by K'Brina

Add chicken and pasta to pot; season with salt and pepper to taste. Divide pasta mixture between baking dishes. If freezing, place remaining parmesan cheese in a zip-top baggie. If cooking, sprinkle on top.
Serve with toasted French bread!!
My family loves it!!


During the busy holiday season it is good to have something you can just pull out of the freezer and bake. 
This one freezes beautifully and is a good hearty meal!

Here are the Freezer instructions:
  Cover pan well with plastic wrap. Place extra cheese in baggie (for topping) on top and then cover entire pan well with foil. Freeze for up to 3 months.

  To bake, preheat oven to 400. Remove foil and plastic from pan and set cheese baggie aside. Place foil back on pan and bake for about 1 1/2 hours.
  Remove foil, stir pasta, and top with cheese. Return pan to oven and bake for an additional 15 minutes (I only did 10 minutes) or until mixture is hot and bubbly throughout.


Tuesday, November 29, 2011

Christmas Plaque

It's beginning to look alot like Christmas!
...and I LOVE it!

I am trying to stay focused this year.

Focused on the true reason for our celebrations.

I thought this would be a good way to keep that
focus front and center in our home.

(This would also be so so cute with a family picture!
I'm going to try that after the holidays.)

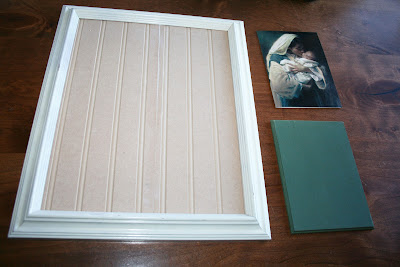
I started with my picture.  Mine was just an old Christmas Card that I cut the front off of.  I used Modge Podge to adhere it to a piece of wood that was cut to the same size as the picture. 
This gives the whole thing some cool dimension.


Next I found an old frame and replaced the
glass with a piece of beadboard.

Then comes the paint.

I used a cream color first, and then I brushed on this fun glaze that I found at Home Depot.  It gives it a shiny, pearly look that I love!

Last step...just glue the picture onto the frame.


Now it REALLY looks alot like Christmas!


Monday, November 28, 2011

My try at an Ornament wreath....

These have been everywhere on Pinterest.  So I thought I would take a whack at it. 
I bought my ornaments from Walmart for $4.96 for each color. 
I had this wire in our garage.  I just sort of eyeballed the size that I wanted it to be. 
Knowing that by adding the balls it was going to get bigger.

Warmed up my favorite tool!!

And started sliding the ornaments on the wire. 
I really don't think there is a right or a wrong way. 
You will fill in later. 


Just keep adding them....

Next is the fun part. 
 Just start gluing and filling in...
Hot glue can be a little tricky.  It can be messy if you aren't careful.
Just make sure to pull all your "glue strings" as you go. 


It's looking better and taking shape.


I hung it up to see where I needed to add to it.  Just keep filling in until you are satisfied. 


Finished!!
Now I need a table runner....

Thursday, November 17, 2011

{Three Thanksgiving-ish Recipes}

Thanksgiving is just around the corner!

Since I have Thanksgiving Dinner on the brain...
I thought I would share a few of my favorite Thanksgiving-ish dishes with you.   They are actually all really good ANYTIME of the year.

Sorry no pics...I've had a really busy week,
but trust me...they are tried and true...and all soooo good.
So if you are looking for something new to try...
these are some yummy options.....

OK, Here we go...

Creamy Mashed Potatoes
(from The Pioneer Woman)

5 pounds Russet Potatoes
3/4 cup Butter
1 (8 oz) package Cream Cheese - softened
1/2 cup (to 3/4 cup) Half-and-Half
1/2 tsp-1 tsp Seasoned Salt
1/2 tsp - 1 tsp black pepper

Peel and cut the potatoes into small chunks.  Bring a large pot of water to a simmer and add the potatoes.  Bring to a boil and cook for 30-35 minutes until fork tender.  Drain.  Place the potatoes back into the dry pot and put back on the stove.  Mash them over low heat, allowing the steam to escape before adding all the other ingredients.

Turn off the stove and add 1 1/2 sticks of butter,the cream cheese, and about 1/2 cup of the half-and-half.  Mash together.  Add seasoning salt and pepper.

Stir well and place in a medium sized baking dish.  Throw a few pats of butter on top and bake at 350 until butter is melted and the potatoes are warmed through.

Serves 10

**You can make this the day before!  Just take it out of the fridge about 2-3 hours before serving time.  Bake at 350 for about 20-30 minutes or until warmed through.


Dinner Rolls
(These are so, so, SO good!! And easy...and I am NOT a bread of any kind maker...I am more of a brick maker...but I never fail this recipe!)

1/2 cup tap hot water
pinch of sugar
2 pkg yeast (or 4 1/2 tsp)
1 cup butter
2 tsp salt
3/4 cup sugar
1 cup boiling water
4 eggs (beaten)
1 cup warm milk
8 1/2 cup bread flour

Mix water, yeast and a pinch of sugar in a bowl...set aside until foamy.

Cream the butter, salt and sugar.  Add boiling water.  Mix until dissolved.

Cool to 105-115 degrees. 

Beat in yeast mixture and eggs.  Beat in flour gradually along with the warm milk.

Knead for 5 minutes or until silky...dough will still be pretty sticky.

Let rise until doubled in size (approx. 1 1/2 - 2 hours)

Punch down and divide into 4 balls.  Roll each one into a 14 inch circle, and cut with a pizza cutter into 12 slices.  Roll each piece from the big end to the small end.  (Like a croissant) and place on a greased cookie sheet with the point tucked under. 

Let rise, covered with a cloth until doubled in size (1 1/2 - 2 hours)

Bake at 400 for 10-12 minutes.

(Makes 48 rolls)


and last but not least, a fabulous fall dessert....

Pumpkin Cream Trifle

1 Spice cake mix
1 small package instant vanilla pudding mix
1 cup canned pumpkin
1/2 cup water
1/2 cup vegetable oil
3 eggs
1 tsp cinnamon
1/2 tsp ground ginger
2 cups cold milk
2 small packages instant cheesecake pudding mix
2 cups Whipped Topping
3/4 cup English toffee bits or almond brickle chips


Combine the first 8 ingredients in a large bowl.  Pour into a greased 9x13 baking pan.  Bake at 350 for 45-50 minutes or until a toothpick inserted comes out clean.  Cool.

In a large bowl whisk the milk and pudding mixes for 2 minutes.  Let stand for 2 minutes or until soft-set.  Fold in Whipped Topping.

Cut cake into 1 inch cubes.  In a 3 quart serving bowl or a trifle bowl, layer 1/3 of the cake cubes, pudding mixture and toffee bits.  Repeat layers twice.  Refrigerate until serving. 

Serves 15-20

Wednesday, November 16, 2011

A printable...

I know that you all have seen all of the "subway" prints out there. 

I needed a little something to fill a frame.

So I threw one together! 

Easy, peasy, lemon squeezy!!

Framed it...

displayed it...


Decided it needed a little flower love.


There you have a quick, FREE,

 easy way to dress up a frame.

Here is the download if you want to print it out and frame it...

Tuesday, November 15, 2011

A thankful tree...

Right now I feel extremely thankful for a lot of things in my life.

Last year we wrote our "thankfuls" on leaves and stuck them on our french door windows.

This year I decided to do something a little different...

and sparkly!

Twigs from a pile in my yard...

a vase...


Orange glitter...

glue...


Some spray on glitter would have made this much easier...
But you gotta work with what you got.


I cut out some "fall-ish" looking scallops with my paper puncher. 

I didn't want a leaf pattern.
But you could totally cut leaves.


Hung them up.


And tonight after dinner we are writing on our "thankfuls"...

Monday, November 14, 2011

Stocking Holders


Anyone else out there love PINTEREST??  Because I am addicted!

Love, Love, LOVE it.

{Where do all those creative people come from anyway??}

So....I have seen different versions of these stocking holders all over Pinterest...
They are pretty basic...... 
 I used an old 2x4 cut into 6 inch blocks.  You can do whatever size you want,
but my mantle is huge so this size was good for me. 

After a good sanding,  I used wood glue and a nail gun to attach them together. 

Glue a decorative knob on the top, screw in a hook to hold the stocking, and paint!

This is where it gets fun!

There are a million ways you could decorate these....I've seen kids pictures, chevron stripes, polka dots, monograms, glitter, all kinds of cute ideas....just get CrEaTiVe!!

It's FUN!

{I used scrapbook paper and some spray painted, Dollar Store jingle bells on mine. 
I had too many helpers at the time to get too crazy, so I went with easy.....and my little boys love the bells.}


Hmmmm.  Now I need some cute stockings.....


Wednesday, November 9, 2011

Drab to Fab!

I know I should be getting ready for the holidays...It's creeping up on me and I have alot to do!

But...I wanted to finish this latest "drab to fab" project first!


I was running out of room to hang my necklaces, so I was in need of another hanger.

I found a solution at the local D.I.  

An old Family Home Evening Board that looked similar to this one..... 

 except it said OLSEN. (Ya, I forgot to take a picture first)

First step was to sand as much paint off as I could...and then I had Mike put a little trim on the edges and add a small shelf to fancy it up a little bit.

Next I added a few coats of paint and then just modge podged a little scapbook paper into the back.


Just a few simple touches and it changed so much!

Now....on to CHRISTMAS!!

Tuesday, November 8, 2011

Rubbing Alcohol...

There are 3 girls in my house...

3 girls equals A LOT of hair spray. 

Yesterday I was sweeping my bathroom floor and noticed the

hairspray yuck built up on the floor,

right under where we stand to "spray".

 And that stuff is so grimy and sticky! 

So I did a little research. 

I mixed a 1/4 of a cup of Alcohol with 3/4 cup of water

and a dash of Dawn together. 

Sprayed it on...

and wiped that grime away!


  And then I googled Rubbing Alcohol to see what else this very inexpensive liquid could do...

This info was copied straight from the Readers Digest Website

1. Remove hair spray from mirrors
When you are spritzing your head with hair spray, some of it inevitably winds up on the mirror. A quick wipe with rubbing alcohol will whisk away that sticky residue and leave your mirror sparkling clean.
2. Clean venetian blinds
Rubbing alcohol does a terrific job of cleaning the slats of venetian blinds. To make quick work of the job, wrap a flat tool — a spatula or maybe a 6-inch (15-centimeter) drywall knife — in cloth and secure with a rubber band. Dip in alcohol and go to work.
3. Keep windows sparkling and frost-free
Do your windows frost up in the wintertime? Wash them with a solution of 1/2 cup rubbing alcohol to 1 quart (1 liter) water to prevent the frost. Polish the windows with newspaper after you wash them to make them shine.
4. Dissolve windshield frost
Wouldn’t you rather be inside savoring your morning coffee a little longer instead of scrape, scrape, scraping frost off your car windows? Fill a spray bottle with rubbing alcohol and spritz the car glass. You’ll be able to wipe the frost right off. Ah, good to the last drop!
5. Prevent ring around the collar
To prevent your neck from staining your shirt collar, wipe your neck with rubbing alcohol each morning before you dress. Feels good too.
6. Clean your phone
Is your phone getting a bit grubby? Wipe it down with rubbing alcohol. It’ll remove the grime and disinfect the phone at the same time.
7. Remove ink stains
Did you get ink on your favorite shirt or dress? Try soaking the spot in rubbing alcohol for a few minutes before putting the garment in the wash.
8. Erase permanent markers
Did your little angel just decide to decorate your countertop with a permanent marker? Don’t worry, most countertops are made of a nonpermeable material such as plastic laminate or marble. Rubbing alcohol will dissolve the marker back to a liquid state so you can wipe it right off.
9. Remove dog ticks
Ticks hate the taste of rubbing alcohol as much as they love the taste of your dog. Before you pull a tick off Fido, dab the critter with rubbing alcohol to make it loosen its grip. Then grab the tick as close to the dog’s skin as you can and pull it straight out. Dab again with alcohol to disinfect the wound. This works on people too.
10. Get rid of fruit flies
The next time you see fruit flies hovering in the kitchen, get out a fine-misting spray bottle and fill it with rubbing alcohol. Spraying the little flies knocks them out and makes them fall to the floor, where you can sweep them up. The alcohol is less effective than insecticide, but it’s a lot safer than spraying poison around your kitchen.
11. Make a shapeable ice pack
The problem with ice packs is they won’t conform to the shape of the injured body part. Make a slushy, conformable pack by mixing 1 part rubbing alcohol with 3 parts water in a self-closing plastic bag. The next time that sore knee acts up, wrap the bag of slush in a cloth and apply it to the area. Ahhh!
12. Clean bathroom fixtures
Just reach into the medicine cabinet the next time you need to clean chrome bathroom fixtures. Pour some rubbing alcohol straight from the bottle onto a soft, absorbent cloth and the fixtures. No need to rinse — the alcohol just evaporates. It does a great job of making chrome sparkle, plus it will kill any germs in its path.

Monday, November 7, 2011

An old fence...

Turned into a piece of art...


I had a big, bare wall in my laundry room. 
 
 
 I wanted to make something for it.
 
 
Something with a beachy feel...
 
 
something turquoise...
 
 
because I LOVE turquoise right now!
 
 
I had a section of our old fence fall down during the last wind storm that we had.
 
 
Free old looking wood!!
 
 
Here is the process...


and I love it.

The top picture doesn't do it justice. 

And the best part is it didn't cost a thing!!

Friday, November 4, 2011

A "thanksgiving-ish" wreath...

Halloween is officially over.  
It was time to take down all the black and orange stuff.
I really don't have a ton of Thanksgiving decor.

A great excuse to make something new!!
I LOVE the look of square wreaths.

A project that would only require cardboard,

leaves, and the trusty glue gun!!

It only took a 1/2 and hour,

start to finish!


Here are the instructions...

in a condensed version.